Introduction: Your Vacation Nails Survival Guide
Vacation nails require a completely different approach than regular weekly manicures. We curated expertise from top nail professionals who specialize in travel-ready manicures and destination wedding designs the kind that survive pool parties, ocean waves, hiking trails, and still look absolutely stunning in every vacation photo.
The biggest mistake travelers make? Getting regular salon manicures the morning of departure and wondering why they chip by day two. Your seasonal nail trends need serious reinforcement when facing tropical humidity, chlorinated pools, and endless hand washing. Whether heading to Caribbean beaches, European ski resorts, or family holiday gatherings, nails deserve better than basic polish that fails mid-trip.
This complete guide covers everything from the best nail art techniques for different destinations to emergency fixes when disaster strikes. We're sharing tropical designs, winter holiday elegance, wedding-ready manicures, and products that actually survive vacation chaos based on extensive testing by professional nail technicians and beauty experts.
Save these tropical nail designs to Pinterest →
What's Trending in Vacation Nails for 2025
Vacation nail trends in 2025 have moved beyond basic French tips and solid colors. The current focus centers on destination-specific designs that tell location stories, mixed with practical durability that maintains appearance throughout entire trips.
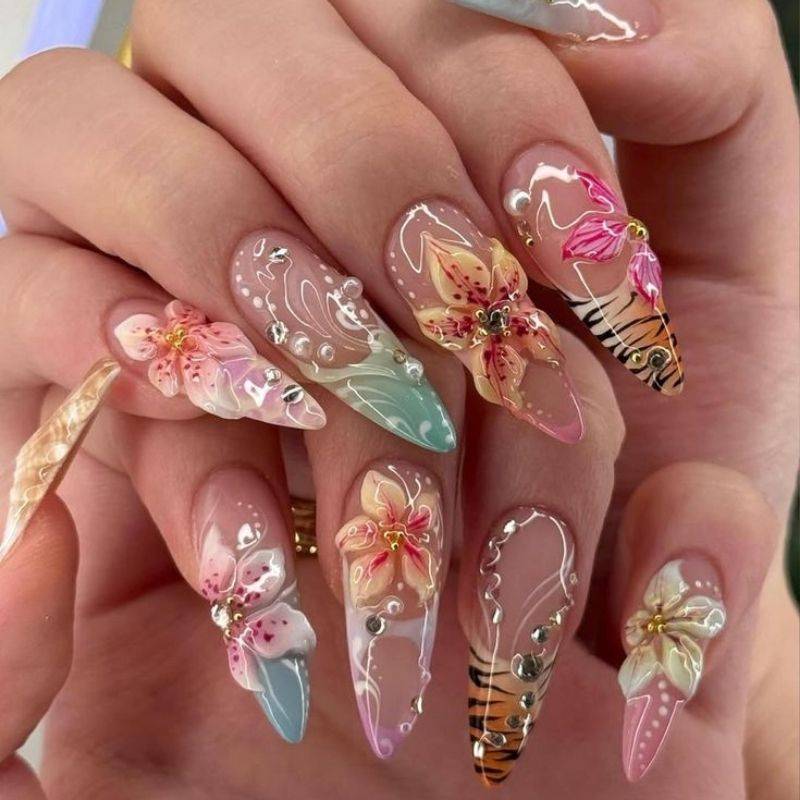
Tropical Vacation Nails: 3D palm tree accents, ocean wave ombre effects, and iridescent chrome finishes that shimmer like seashells dominate beach destination trends. Sunset gradients fading from coral to deep purple, turquoise bases with gold foil palm leaves, and jelly nails resembling beach glass are consistently popular. The trendy nail designs collection showcases this maximalist tropical energy balanced with elegance.
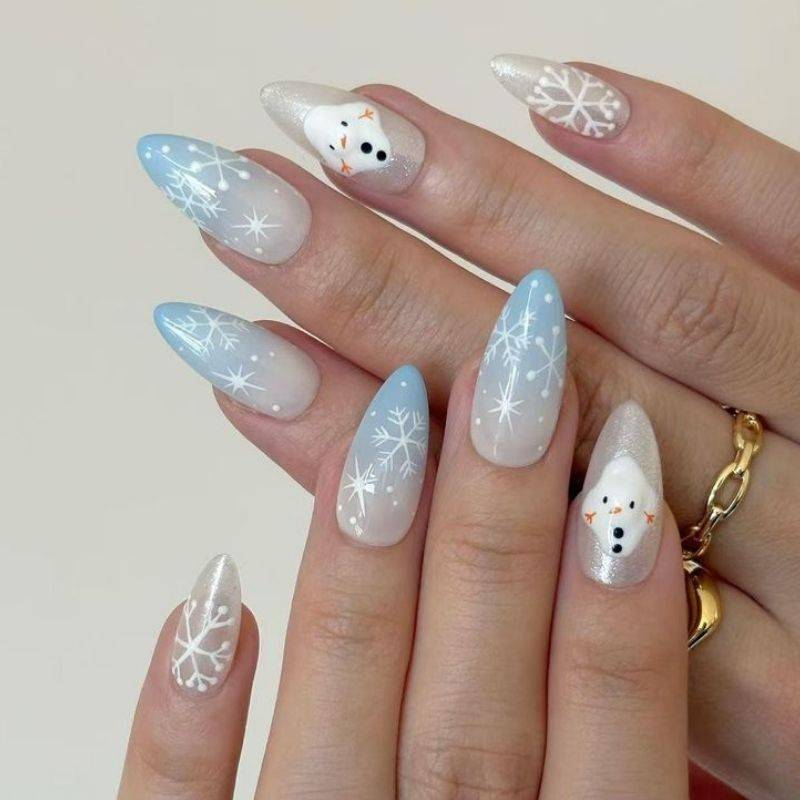
Winter Holiday Vacation Nails: Rich jewel tones, metallic accents, and subtle sparkle photograph beautifully in snow. Deep emerald green with gold tips, burgundy chrome, and glazed finishes look sophisticated at holiday parties while remaining casual enough for ski lodges. The winter nails guide provides detailed breakdowns of this aesthetic.
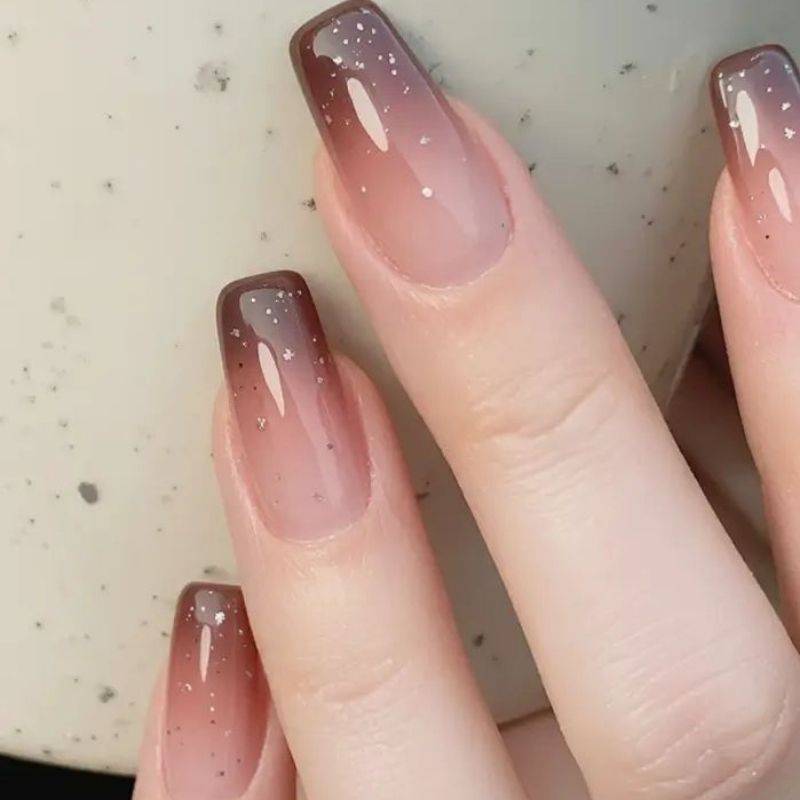
Minimalist Vacation Nails: Neutral beiges, soft pinks, and clean white tips work for virtually any destination and match every outfit. These designs appear expensive, hide growth better than bold colors, and never go out of style. Professional nail artists recommend this approach for longer trips where fills aren't possible.
Wedding Destination Trends: Brides want nails that look bridal but survive entire wedding weekends rehearsal dinners, beach bachelorette parties, ceremonies, and honeymoons. Soft nudes with delicate gold accents, pearl embellishments, and French tips with modern twists are consistently requested. Check modern nail styles for multi-day event designs.
Mismatched Vacation Nails: Each finger tells different parts of trip stories one nail with destination flag colors, one with beach waves, one with palm trees, one solid color, one with initials. When executed properly, this creates cohesive yet interesting looks. Your nail care routine remains consistent regardless of design complexity, making these surprisingly practical.
Choosing the Right Vacation Nail Type
Gel polish lasts 2-3 weeks and handles water best for most vacations. Press-on nails work great for 7-10 day trips when applied with strong glue. Hard gel extensions offer 3-4 weeks of durability but require professional removal. Choose based on trip length and activity level.
This decision significantly impacts vacation nail success. Professional nail technicians report seeing many travelers waste money on wrong nail types, ending up with bare nails by day three. Here's what actually works based on extensive destination experience.
Gel Polish: The Vacation MVP
Gel polish is the top recommendation for 90 percent of vacations according to professional manicurists. It lasts 2-3 weeks, handles chlorine and saltwater exceptionally well, and dries instantly allowing immediate packing after appointments. Quality gel polish collections offer incredible vacation-ready shades that don't fade in sun or water.
Professional nail technicians consistently advise getting gel nails done 2-3 days before travel. This timing allows complete curing and bonding to natural nails. Cabin pressure changes during flights can affect same-day gel application, potentially causing lifting issues.
For DIY gel at home, investing in quality LED lamps makes massive differences in longevity. Proper curing power combined with budget-friendly yet durable gel polish sets delivers professional results that survive vacation activities.
Press-On Nails: The Quick Fix
Press-on technology has improved dramatically in recent years. Salon-quality designs now last 7-10 days when applied correctly. High-quality press-on sets provide convenient last-minute vacation prep solutions.
The secret according to nail professionals: use actual nail glue instead of adhesive tabs. Strong nail glue creates bonds capable of surviving swimming, snorkeling, and even rock climbing. Apply press-ons 1-2 days before trips and avoid submerging hands in water for first 24 hours.
Press-ons work brilliantly for beach vacations because removal requires no acetone or filing. Simple warm soapy water soak removes them for natural nail recovery time. Reusable luxury options with chrome polish create stunning custom designs.
Hard Gel Extensions: For Long Trips
Month-long European adventures or extended honeymoons justify hard gel extension investments. They last 3-4 weeks minimum and add length without acrylic damage. Professional nail technicians report gel extensions staying perfect through two-week intensive activity trips.
The requirement: professional application and removal. DIY removal attempts consistently result in damaged nail beds. Book removal appointments for few days after returning home to avoid post-vacation scrambling.
What About Regular Polish?
Regular polish isn't vacation-appropriate unless trips last 3 days maximum according to professionals. Chlorine, saltwater, sun exposure, and constant hand washing destroy regular polish within 48 hours. Only recommended for short city breaks without water activities.
For regular polish insistence, quality fast-dry top coats require daily reapplication. Bringing bottles in carry-ons becomes essential for maintenance.
Save these winter vacation nails to Pinterest →
Tropical Beach Vacation Nail Designs
Tropical vacation nails dominate professional nail artist portfolios specializing in destination work. These designs survived entire wedding weekends, beach bachelorette parties, and extended honeymoons with proper application techniques.
Tropical designs must be vibrant enough to pop in photos while durable enough to survive actual beach activities. Here's what works based on extensive professional experience with tropical destinations.
Color Palettes That Work
Turquoise blue complements every skin tone, photographs beautifully against sand and ocean, and enhances tans. Paired with coral pink, sunny yellow, or bright white, it delivers maximum vacation energy. High contrast makes these nails stand out in sunset selfies.
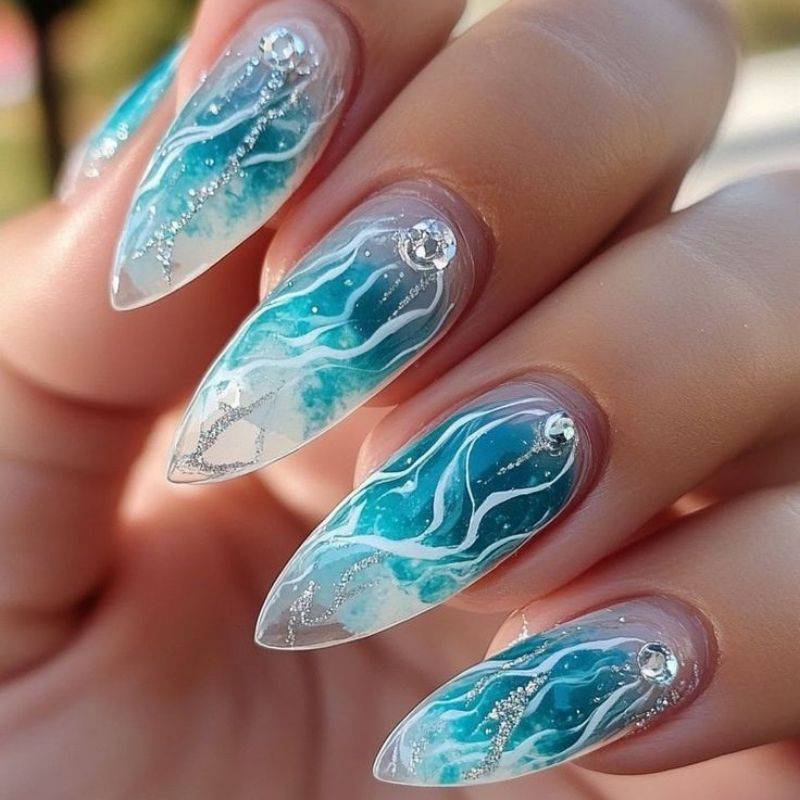
For sophisticated options, ocean wave ombre effects fading from deep navy to seafoam green mimic actual tropical water and look expensive without being overwhelming. Multiple gel polish shades blended while wet create seamless gradients.
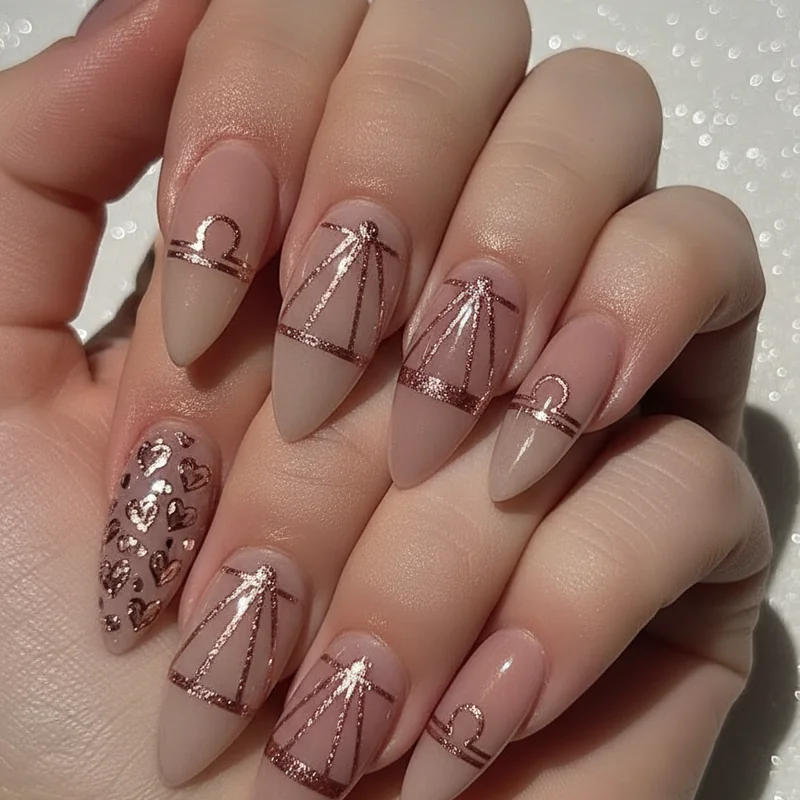
Metallic gold and rose gold excel in tropical settings. Sun catches these finishes gorgeously, and they hide minor wear better than matte colors. Gold tips on nude bases work for beach clubs, resort dinners, and adventure activities without looking misplaced.
Design Ideas for Beach Destinations
Palm tree accent nails remain classics. Professional nail artists typically apply one or two accent nails per hand with tiny palm trees using precision detail brushes. Keeping other nails solid prevents overly busy appearance. Balance maximalist tropical vibes with actual elegance.
Seashell embellishments add vacation energy but require strategic placement. 3D elements work best on one or two nails maximum, never on nails used for typing or texting. Losing rhinestones in hotel rooms on day two kills vacation vibes.
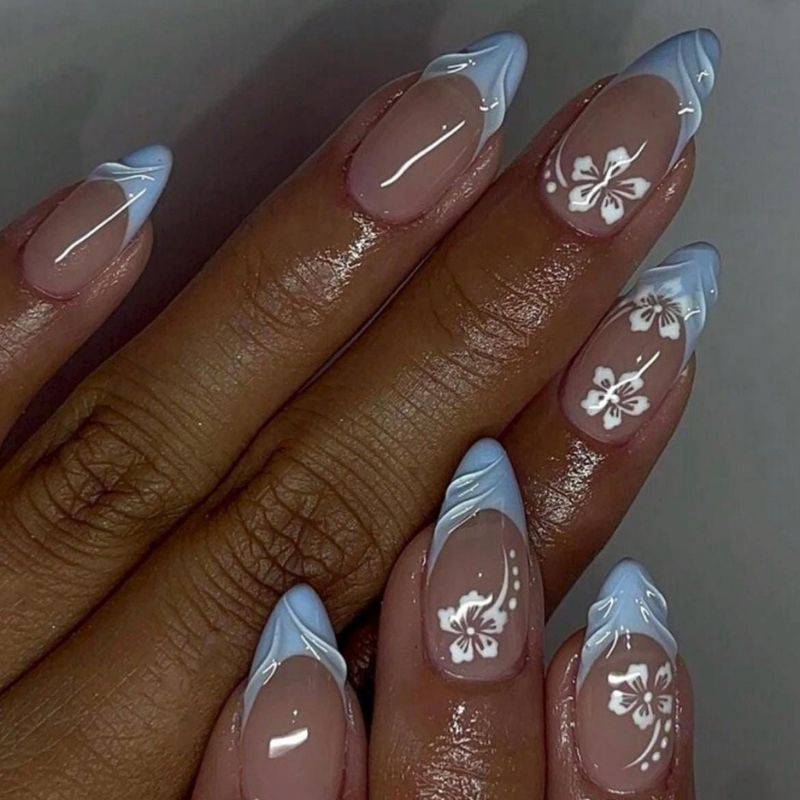
Hibiscus flowers painted on accent nails deliver tropical vacation aesthetics without juvenile appearances. Bright pink or red petals with deep green leaves photograph incredibly well and complement both swimsuits and evening resort wear. Check seasonal collections for color inspiration.
Destination-Specific Designs
Caribbean trips call for bright, bold colors with playful elements. Turquoise bases with gold foil accents, tropical fruit designs like pineapples or coconuts, and jelly nails resembling beach glass consistently trend. Colors matching destination flags or local vibes create cohesive looks.
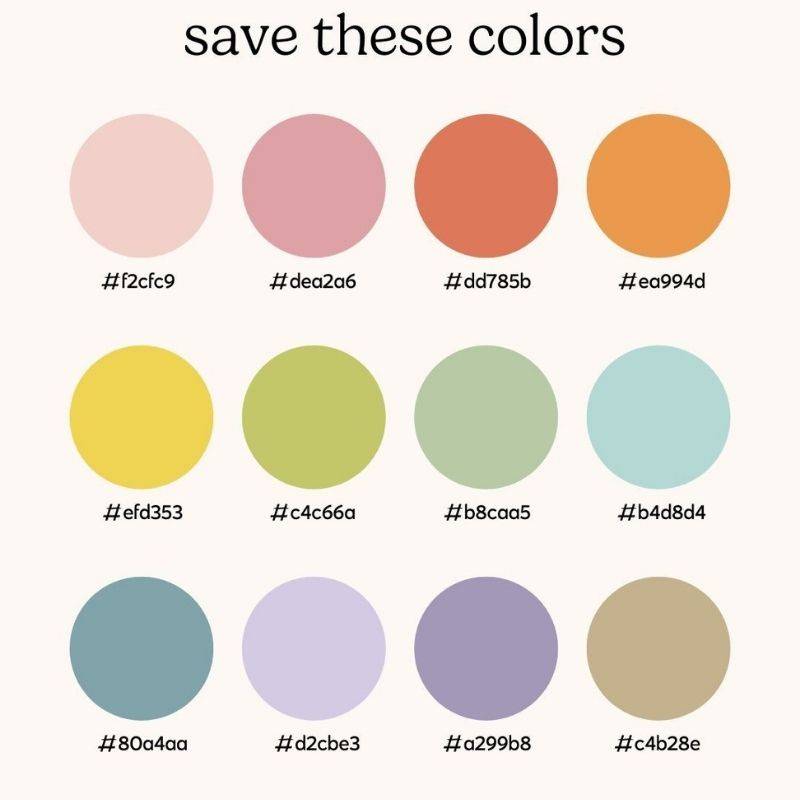
Hawaiian vacations deserve plumeria flower designs, sunset ombre effects, and nature-inspired Polynesian patterns. Cultural sensitivity matters stick to nature elements rather than sacred symbols. Color matching guides help choose shades complementing skin tones for maximum photo impact.
Save these Caribbean nail designs to Pinterest →
Mediterranean beaches look stunning with nautical-inspired designs. Navy and white stripes, anchor accents, and rope details give classic vacation vibes without being too literal. These designs work equally well for Greek islands, Italian coastlines, or French Riviera trips.
Winter Holiday Vacation Nail Designs
Winter vacation nails require designs that work for both outdoor adventures and fancy holiday dinners. Professional nail artists report successful combinations: deep burgundy chrome with subtle snowflake accents looked perfect at morning ski sessions and evening fondue dinners.
Winter holiday nails must balance festive energy with practical durability. Cold weather increases nail brittleness, dry mountain air causes cuticle issues, and constant glove removal tests even best manicures. Here's what survives winter vacation challenges.
Winter Holiday Color Palettes
Deep jewel tones dominate winter vacation nails according to professional trend analysis. Emerald green, sapphire blue, ruby red, and amethyst purple photograph gorgeously against snow and look sophisticated at holiday parties. The winter nail color trends perfectly capture this aesthetic rich, elegant, and festive without costume-like appearance.
Metallic finishes are winter vacation essentials. Gold chrome, silver foil, and bronze shimmer catch light beautifully in natural winter sunlight and evening candlelit dinners. Chrome polish creates mirror-like finishes making winter nails look expensive and polished.
Classic burgundy and deep wine shades never go out of style for winter vacations. These colors hide minor wear incredibly well, complement every winter outfit, and look equally appropriate for ski lodges and upscale restaurants. Gold accents add maximum holiday elegance.
Ski Resort and Mountain Getaway Designs
Ski trips and mountain cabins require relatively simple designs since gloves are worn constantly. Professional manicurists recommend short to medium length nails in durable gel polish with minimal 3D elements. Snowflake accents on one or two nails add festive vibes without interfering with activities.
Glazed nail trends work brilliantly for ski vacations because subtle shimmer looks sophisticated yet practical. Sheer nude or soft pink bases with iridescent chrome powder create Instagram-worthy finishes surviving actual mountain life. This technique has proven successful during countless winter trips requiring fancy but functional nails.
Cable knit sweater designs painted on accent nails trend for winter vacations. This textured look mimics actual winter wardrobes and photographs gorgeously against mountain backgrounds. Matte top coat with glossy accent lines creates dimension. Check Thanksgiving nail guide for similar cozy design inspiration.

Save these ski resort nails to Pinterest →
Holiday Party Vacation Nails
Winter vacations centering around holiday parties and family gatherings allow bold sparkle and metallic accents. Deep red with gold glitter tips, emerald green with silver snowflakes, or classic red and white candy cane stripes all deliver maximum holiday energy.
Rhinestone accents work for party-focused vacations but require strategic placement on nails not used for constant activity. Professional nail artists typically apply rhinestone designs on ring fingers only, keeping other nails solid or with subtle accents. This prevents losing expensive embellishments mid-trip.
The New Year nails guide covers transition designs working from Christmas through New Year celebrations for vacations spanning multiple holidays.
Wedding Destination and Honeymoon Nails
Wedding destination nails represent specialty work where extensive professional experience proves invaluable. Brides need nails looking perfect for engagement photos, rehearsal dinners, actual ceremonies, reception dancing, day-after brunches, and surviving entire honeymoons.
The biggest wedding nail failure? Regular polish applied morning of Mexico flight for beach wedding. By landing, three nails chipped. This experience taught everything about proper wedding vacation nail timing and durability according to professionals who fixed the emergency.
Timing Your Wedding Vacation Nails
Get wedding nails done exactly 2-3 days before departure. Not morning of travel, not week before exactly 2-3 days. This gives gel time to fully cure and bond while keeping them looking fresh for actual wedding day. Professional nail technicians have tested every possible timing scenario confirming this window works perfectly.
For technique, always use gel polish or press-ons for destination weddings. Never regular polish, never acrylics needing fills mid-trip. Gel lasts through entire wedding weekend plus honeymoon. Quality gel polish systems have held up through countless beach ceremonies, pool parties, and honeymoon adventures without single chips.
Bridal Nail Design Ideas
Classic French tips remain most popular wedding nail choice they photograph beautifully, match every outfit during wedding weekend, and look elegant without stealing focus from rings. Modern versions include soft pink ombre tips, gold foil accents on tips, or subtle glitter gradients for contemporary French feeling bridal.
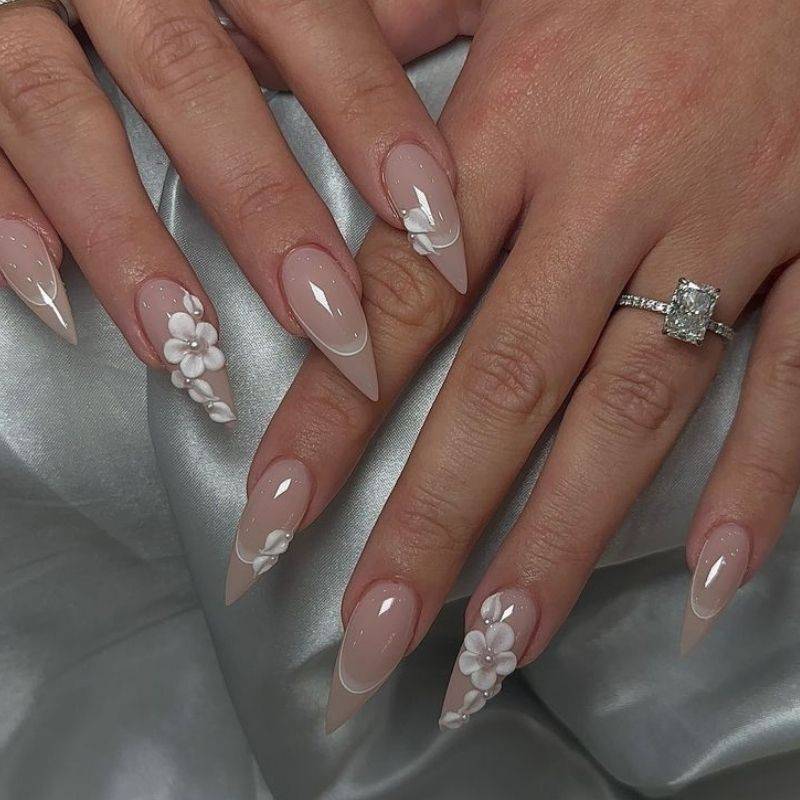
Soft nude and blush pink shades work gorgeously for brides wanting understated looks. These colors elongate fingers in photos, complement every skin tone, and hide minor growth better than stark white for extended honeymoons. Skin tone guides help choose perfect nude shades for individual complexions.
Pearl and rhinestone accent nails add bridal luxury without overdoing it. Professional nail artists typically place delicate pearls on ring fingers only so they don't interfere with activities but still photograph beautifully in ring shots. Strong nail glue secures embellishments with two gel top coat layers for protection.
Honeymoon-Ready Durability
Wedding nails must survive not just ceremonies but entire honeymoons. Professional manicurists always recommend keeping length short to medium just past fingertips. This prevents breakage during honeymoon activities like snorkeling, hiking, or adventure sports while still looking polished and feminine.
Apply cuticle oil twice daily during honeymoons to prevent lifting. Small jojoba oil bottles fit perfectly in carry-on bags and prevent dry, lifted looks happening in tropical or dry climates. This single habit has saved countless honeymoon manicures.
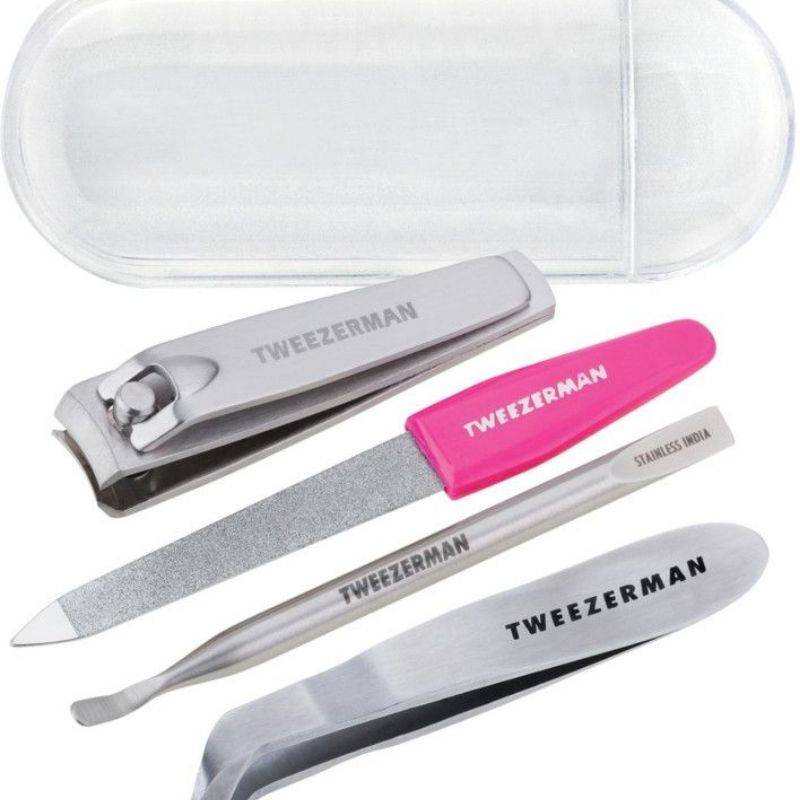
Bring emergency nail kits with nail glue, small files, and matching gel polish. TSA-compliant mini nail file sets have saved multiple brides from broken nail disasters during destination weddings. Pack in carry-ons, not checked luggage.
Save these wedding destination nails to Pinterest →
The Complete Vacation Nail Tutorial
Apply vacation nails 2-3 days before travel using gel polish for 2-3 week durability. Prep nails thoroughly, use thin gel coats, cap free edges, and cure properly under LED lamp. Finish with cuticle oil and reapply twice daily during vacation to prevent lifting and maintain flexibility.
This exact process is used by professional nail technicians specializing in destination work. It works for tropical beaches, winter mountains, city breaks virtually any vacation scenario. The key involves proper prep and right products because vacation nails face significantly more abuse than regular weekly manicures.
Professional nail artists perfected this technique through years of destination wedding experience and extensive testing. The method delivers consistent results surviving various vacation challenges.
Step 1: Prep Your Natural Nails (15 minutes)
Start with completely clean, polish-free nails. Remove any old polish using acetone, then wash hands with antibacterial soap removing all oils. Push back cuticles gently with quality cuticle remover classic formulas work better than expensive alternatives.
Lightly buff nail surface with buffer removing shine and creating texture for gel adhesion. Don't file down natural nail, just remove glossy top layer. Wipe nails with isopropyl alcohol using lint-free wipes removing all dust and oils. This step is critical any oil residue causes lifting during vacation.
Shape nails to desired length using nail file. For vacations, professionals strongly recommend short to medium length just reaching or slightly passing fingertips. This prevents breakage during activities while still looking polished. File in one direction only preventing splitting.
Step 2: Apply Gel Base Coat (5 minutes)
Apply thin gel base coat layer from cuticle to free edge, capping tip by running brush along free edge. Avoid getting base coat on skin or cuticles as this causes lifting. Clean up any skin contact with clean alcohol-dipped brush before curing.
Cure under quality LED lamp for exactly 30 seconds. Don't skip or reduce time under-cured gel causes premature lifting. Base coat creates strong foundation preventing staining from colored polish and improving overall adhesion.
Step 3: Apply Gel Color (15 minutes)
Apply first gel color coat thinly and evenly. Thin coats are key for vacation durability they cure more completely and last longer than thick applications. Ensure complete coverage from cuticle to free edge, capping tips. Cure 30 seconds under LED lamp.
Apply second thin color coat for full opacity. Most gel colors require two coats achieving rich, even color. Cure 30 seconds again. For darker or more pigmented colors, two thin coats always beat one thick coat for longevity and appearance.
Step 4: Apply Gel Top Coat (10 minutes)
Apply generous gel top coat layer over entire nail surface, ensuring complete coverage including nail edges and tips. Cap free edge by wrapping brush along tip this seals everything preventing water penetration during vacation swimming and activities.
Cure 60 seconds under LED lamp. Most top coats require longer curing times than color or base coats. After curing, wipe off tacky layer using isopropyl alcohol and lint-free wipe. This reveals glossy, smooth finish protecting color from chlorine, saltwater, and sun exposure.
Step 5: Finish and Maintain (5 minutes initial, ongoing)
Massage cuticle oil into skin surrounding nails and onto nail surface immediately after completing manicure. This hydrates skin and adds flexibility preventing cracking. Most importantly, reapply cuticle oil twice daily during entire vacation morning and night minimum.
This single habit extends wear time by at least one week and prevents dry, lifted appearance happening in different climates. Keep small bottles in purse, beach bag, and hotel bathroom for consistent application.
Pro Tips from Professional Nail Technicians
Wait 24 hours after application before swimming or soaking hands in water. This waiting period ensures complete curing and bonding. Book nail appointments 2-3 days before travel so this timing works perfectly.
Reapply gel top coat every 4-5 days during long vacations. Bring small top coat bottle in travel kit for quick refresh coats sealing micro-chips before becoming real problems. Quality fast-dry top coats work over gel as protective layers.
Wear waterproof sunscreen on hands during beach vacations. UV exposure fades gel color and breaks down top coat faster. Reapply sunscreen after every swim just like for body protection.
Save this gel nail tutorial to Pinterest →
Vacation Nail Color Guide by Destination
Choosing right colors for specific destinations significantly impacts how nails photograph and how long they visually last. Color context matters more than people realize according to professional nail artists with extensive destination experience.
Caribbean and Tropical Beach Destinations
Bright, saturated colors excel in tropical settings. Turquoise blue, coral pink, sunny yellow, and tropical orange pop gorgeously against sand and ocean. These colors complement tanned skin beautifully and make every beach photo more vibrant. Budget-friendly gel polish sets offer perfect tropical color ranges.
Metallic gold and rose gold photograph incredibly well at beach destinations. Sun catches these finishes throughout day, creating different looks from morning to sunset. Gold chrome on nude bases delivers tropical vibes without committing to bold colors.
White and cream shades look clean and sophisticated against tropical backgrounds. These colors work for every resort activity from beach clubs to fine dining and never clash with vacation wardrobes. White tips on nude or clear bases give classic French manicure energy that never dates.
European City Breaks
Sophisticated neutrals and classic reds dominate European vacation nails. Soft beiges, elegant taupes, deep burgundy, and classic red complement architecture and aesthetic of European cities while looking polished for museums, cafes, and evening activities. At-home nail techniques help achieve salon-quality European-inspired nails.
Dark navy and deep emerald green work beautifully for city vacations. These rich colors photograph well against historic buildings and cobblestone streets while hiding minor wear from walking and sightseeing. They're practical and elegant simultaneously.
Metallic silver and gunmetal gray give modern, edgy vibes perfect for contemporary European cities like Berlin, Amsterdam, or Copenhagen. These colors feel fashion-forward without being too bold for daytime sightseeing.
Mountain and Ski Resort Getaways
Deep jewel tones reign for mountain vacations. Ruby red, sapphire blue, emerald green, and amethyst purple look stunning against snow and evergreens. These colors work equally well on ski slopes and at aprés-ski lounges. Winter nail collections provide mountain-appropriate color inspiration.
Glazed finishes in soft pinks or nudes work perfectly for ski trips. Subtle shimmer looks sophisticated yet practical, hides minor wear from gloves, and complements every winter outfit. This is the top recommendation for low-maintenance mountain nails.
Burgundy and deep plum shades are mountain vacation classics because they look expensive, hide wear incredibly well, and photograph beautifully in both natural snow light and cozy lodge settings. These colors never look misplaced during mountain getaways.
Desert and Southwestern Destinations
Earthy terracotta, burnt orange, and desert sunset colors look stunning in Southwestern settings. These warm tones complement natural landscape and look gorgeous in photos against red rocks and desert scenery. Pair with gold accents for maximum desert glam.
Turquoise and bright teal reference traditional Southwestern jewelry and photograph beautifully. These colors work for both adventure activities like hiking and evening activities in cities like Santa Fe or Sedona. They feel vacation-appropriate without being too tropical.
Neutral beiges and warm taupes blend beautifully with desert landscapes while staying practical for dusty adventure activities. These colors are perfect for understated elegance during desert vacations.
Essential Vacation Nail Products and Travel Kit
Professional nail technicians recommend packing minimal, strategic supplies rather than entire nail polish collections. After extensive travel experience, essential products have been identified for vacation nail survival.
The Non-Negotiable Products
Reliable base coat prevents staining and improves adhesion. Quality press-on sets work perfectly for press-on applications, while gel polish systems require matching base coats. Never skip this step even when rushed.
Emergency nail glue is absolutely critical according to professionals. Small tubes have saved countless vacation manicures. Broken press-on? Fixed in 30 seconds. Natural nail crack? Sealed and protected immediately. This tiny essential is invaluable when disaster strikes mid-trip.
Cuticle oil becomes essential during vacation. Different climates create havoc tropical humidity causes swelling and lifting while dry mountain air creates cracking. Jojoba oil absorbs quickly without leaving greasy residue on phone screens or hotel surfaces.
The TSA-Compliant Travel Kit
Build TSA-compliant nail emergency kits in clear quart-size bags. Include one small matching polish or top coat bottle (under 3.4oz), cuticle oil, nail glue, and alcohol wipes. Mini nail file sets fit perfectly covering every filing need from shaping to smoothing rough edges.
Pack this bag in carry-ons, never checked luggage. Delayed checked bags leave travelers without nail supplies for important events. Emergency kits staying in carry-ons have saved countless vacation manicures from minor disasters.
Include few alcohol wipes for cleaning nail surfaces before emergency repairs. These wipes also work for removing sticky residue, cleaning sunglasses, and numerous other vacation uses beyond nails.
Products to Leave at Home
Don't bring LED lamps unless traveling longer than three weeks. They occupy valuable luggage space and rarely get used. For extended trips requiring gel touch-ups, most resorts and cities have nail salons available.
Skip bringing multiple regular polish bottles. Choose one neutral shade and one fun color maximum if regular polish is necessary. Better yet, do gel or press-ons before leaving and skip polish entirely. Backs thank you when carrying luggage.
Leave fancy nail art supplies at home unless nail art is literally the trip purpose. Dotting tools, striping brushes, rhinestones, and 3D elements aren't vacation essentials. Keep travel kits minimal and functional.
Hand and Nail Care During Travel
Bring travel-size hand cream in purses for airplane cabin dryness. Planes destroy hands and cuticles. Apply hand cream and cuticle oil immediately after takeoff and every two hours during long flights. This prevents dry, lifted appearance from recycled cabin air.
Wear sunscreen on hands during beach and outdoor vacations. Strengthening base coats don't protect against UV damage. Apply waterproof sunscreen to hands and reapply after swimming to prevent color fading and top coat breakdown.
Pack cotton glove pairs for overnight cuticle treatments on longer vacations. Apply cuticle oil or hand cream heavily before bed, put on cotton gloves, and wake with perfectly hydrated hands. This intensive treatment once or twice during trips keeps everything looking fresh.